
How to Set a Print Area in Google Sheets
Select and print a specific Google Sheets range, adjust its layout, save it as a PDF, and extend the print area as data grows.
To set a print area in Google Sheets, select the cells you want to print, choose File > Print, and change Print to Selected cells. The selection applies only to the current print job, so you’ll need to select a larger range after adding new rows.
This guide uses the Google Sheets Print Area: Weekly Work Queue Template to print A1:J22, exclude unused rows, and extend the range to A1:J23.
What You'll Need
- A Google Sheets file containing the range you want to print
- Access to a printer or PDF destination
- Optional: Copy this Google Sheets template or download the Excel file
Step-by-Step Guide
Select the cells for the print area
Open the template and select the Weekly Print Queue tab. The sample report occupies A1:J22:
- Rows 1-9 contain the title, summary, and instructions.
- Row 10 contains the record headers.
- Rows 11-22 contain the 12 supplied records.
Drag from A1 to J22. Alternatively, enter A1:J22 in the name box near the formula bar and press Enter.
In the unchanged workbook, you should see these control values:
B4: 12 total jobsJ4: 55 planned hoursJ5: 60 capacity hoursB6: Within capacityH6: 5 remaining hours
These results were recorded in Google Sheets using the supplied 12-record queue.
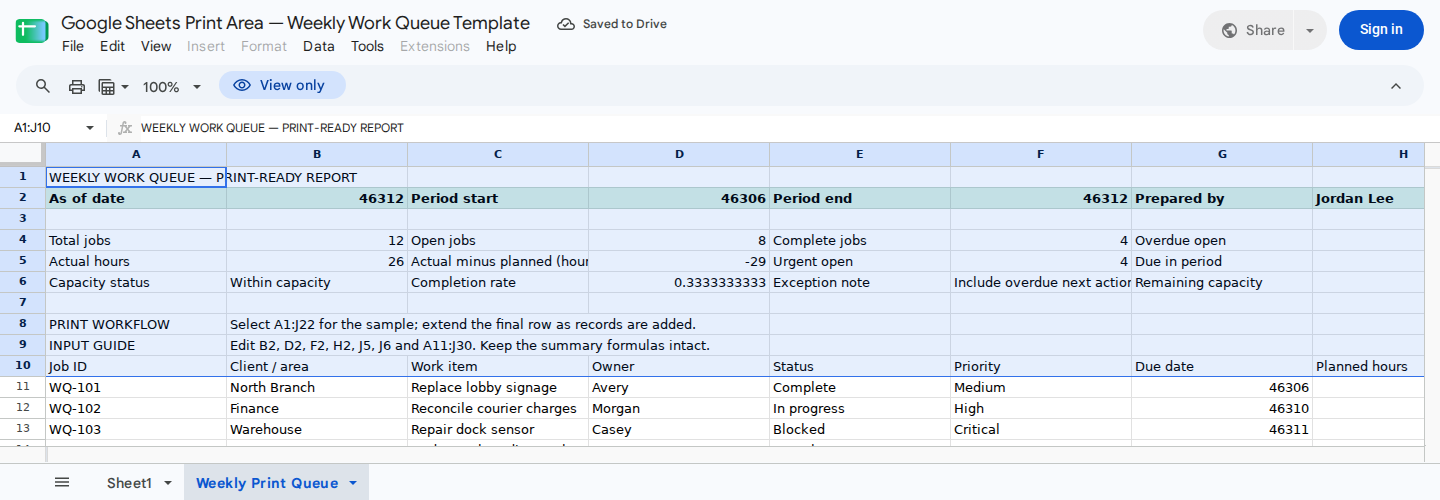
The summary shows workload, exceptions, and capacity before the detailed records.
Choose Selected cells
With A1:J22 selected:
- Choose File > Print.
- Open the Print setting.
- Select Selected cells instead of Current sheet or Workbook.
The preview should start with the report title in row 1 and end with the final supplied record in row 22. Neither row 23 nor cells outside columns A:J should appear.
Google explains this option and the related layout controls in its Google Sheets printing guide.
Adjust the page layout
Use the print settings to keep all 10 report columns readable:
- Set Orientation to Landscape.
- Set Scale to Fit to width.
- Adjust the margins for the selected paper size.
- Turn off Show gridlines if the report borders provide enough structure.
- Confirm that columns A through J remain visible.
Fit to width helps prevent horizontal clipping, though a wide range can make the text small. If it’s difficult to read, reduce the margins, select a larger paper size, or print fewer columns.
Check the preview and print or save
Before continuing, verify that:
- The title and summary appear first.
- All 12 records through row 22 are included.
- Row 23 is excluded.
- Columns A through J are visible.
- No trailing blank pages appear.
- The text is readable at the selected scale.
Once the preview looks correct, choose Next. In the browser or system print window, select a printer or an available PDF destination such as Save as PDF.
After saving a PDF, open it and confirm that its first and last visible rows match the preview.
Extend the print area when data grows
Google Sheets doesn’t automatically add new records to a previously selected print range.
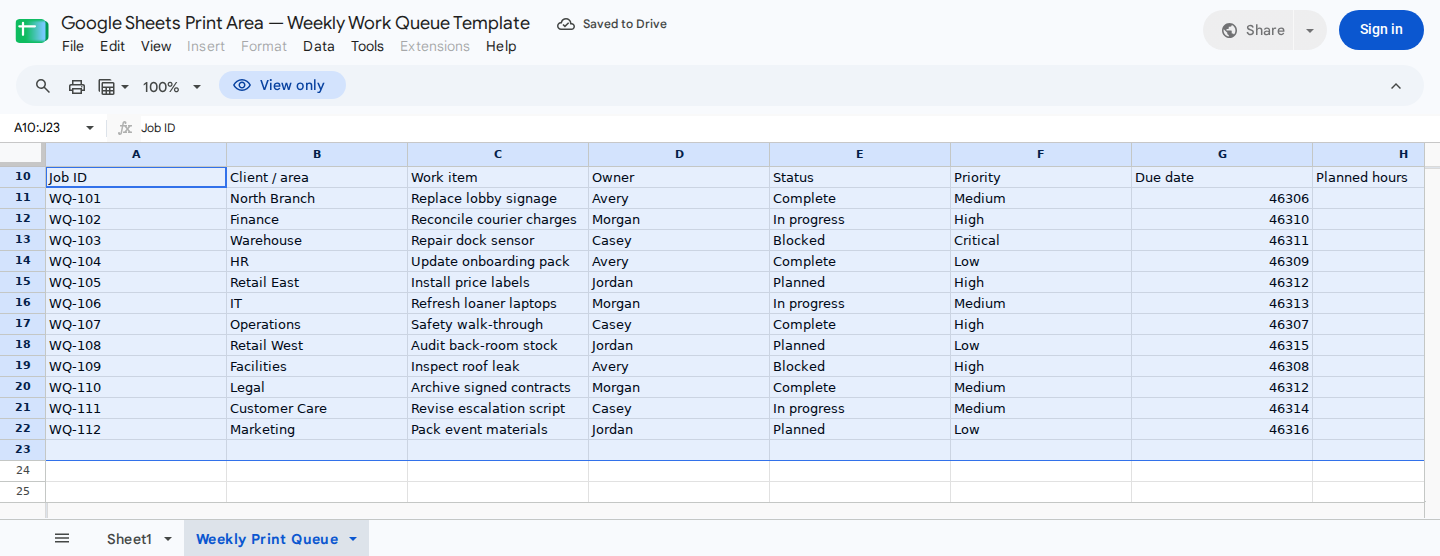
The record log feeds the summary and shows where to add the next job before extending the selected print range.
After adding a record in A23:J23:
- Select
A1:J23. - Choose File > Print.
- Set Print to Selected cells.
- Confirm that row 23 appears in the preview.
- Check that row 24 remains excluded.
To make the new record work with the template’s calculations:
- Enter a numeric date in
G23and apply the Date number format. - Enter numeric planned and actual hours in
H23:I23. Use0actual hours if work hasn’t started. - Set
E23to Planned, In progress, Blocked, or Complete. - Set
F23to Low, Medium, High, or Critical.
The template’s supported record-entry area ends at row 30. Instead of automatically printing A1:J30, select A1 through the last populated row.
Cell J2 documents the range used for a print batch. You can change it from A1:J22 to A1:J23, but editing J2 doesn’t change the actual print selection.
Fix common print-area problems
The whole sheet appears: Return to the sheet, select the intended range again, and confirm that Print is set to Selected cells.
The last record is missing: Make sure the selection includes the final populated row. For example, expand A1:J22 to A1:J23.
Columns are clipped: Choose Landscape and Fit to width, then inspect the preview again.
The text is too small: Reduce the margins, choose a larger paper size, or select fewer columns.
Blank pages appear: End the selection at the final populated record instead of including unused trailing rows. When checking the template for unintended blank records, inspect only A11:J30. Rows 3 and 7 are intentional separators and should remain blank. If the record area contains unwanted empty rows, see how to delete blank rows in Google Sheets.
Check the report with ModelMonkey
ModelMonkey can inspect Google Sheets content and help identify blank records, misplaced content, or formatting that may need attention. It doesn’t have documented control over the Google Sheets print dialog.
For this report, ask ModelMonkey to:
- Check
A11:J30for unintended completely blank rows between active records. - Inspect the whole sheet or a broader range such as
A1:Z30for populated cells beyond column J. - Find content below the intended final record row.
Review the findings and any proposed edits. Then select A1:J[last populated row] and complete the printing steps in Google Sheets.
Wrapping Up
Select the exact range, choose File > Print > Selected cells, and check its boundaries in the preview. In the supplied template, A1:J22 contains the summary and all 12 records. After adding a record in row 23, select A1:J23. You can also update J2 to document the range used.
Frequently Asked Questions
Can I save a permanent print area in Google Sheets?
The Selected cells workflow applies to the current print job. Select the updated range again whenever the data changes. Writing a range in a cell such as J2 documents it, but it doesn’t control printing.
How do I print only certain cells in Google Sheets?
Select the cells, choose File > Print, and set Print to Selected cells. Before continuing, check the first row, last row, and required columns in the preview.
How do I stop extra blank rows from printing?
End the selected range at the last populated record. If row 23 is the final record, select A1:J23 rather than A1:J30.
Why are columns missing from the print preview?
The range may be too wide for the current orientation or scale. Choose Landscape and Fit to width, then confirm that all required columns are visible.
How do I add new rows to the print area?
Add the records, select the report again through the new final row, and choose File > Print > Selected cells. For example, change the selection from A1:J22 to A1:J23 after populating row 23.